Sunday, September 11, 2011
Saturday, September 10, 2011
How to make improvised iPhone tripods
If you use your iPhone to take photos, you may have an app such as Camera+ that allows you to take a photo on a timer. Sounds good, this could be useful for a self portrait or a group picture with yourself in it. But how are you going to prop up the iPhone to take the picture? There are iPhone specific mini tripods, but I'm going to show you how to make improvised iPhone camera tripods out of everyday things. (Actually these aren't literally "tripods," but they are ways to stabilize the iPhone in the right orientation for taking a hands-free photo)
The first method is to take a small glass with sloping sides, and a stack of Post-its, then split the stack of Post-its in half and put the iphone in the glass between them, like this:


If you want to turn the iPhone sideways to take a landscape-orientation picture or video, that works too, but it is a little trickier to get the Post-its arranged just right:


The second method works if you have a flip case for your iPhone. I have one from Belkin that looks like this:

Take the iPhone out of the case, then stand the iPhone up in the part of the case where the screen normally is, like this:
 Now you can take a timer photo in the vertical orientation.
The third method is to get one of those cardboard insulating sleeves from Starbucks that makes it more comfortable to hold the hot coffee cup. This works best when the sleeve is brand new and the cardboard is still stiff. Stand the iPhone up in the coffee sleeve and take a timer photo:


I hope these tricks are useful to other iPhone photographers out there.
The first method is to take a small glass with sloping sides, and a stack of Post-its, then split the stack of Post-its in half and put the iphone in the glass between them, like this:


If you want to turn the iPhone sideways to take a landscape-orientation picture or video, that works too, but it is a little trickier to get the Post-its arranged just right:


You want the sticky part of the post it pressed against the back of the iPhone.

Take the iPhone out of the case, then stand the iPhone up in the part of the case where the screen normally is, like this:

The third method is to get one of those cardboard insulating sleeves from Starbucks that makes it more comfortable to hold the hot coffee cup. This works best when the sleeve is brand new and the cardboard is still stiff. Stand the iPhone up in the coffee sleeve and take a timer photo:

Finally, if you have the Belkin flip case and the coffee sleeve, you can stand the flip case in the sleeve, turn the iPhone sideways, and put it into the top of the case like this:

Wednesday, August 17, 2011
My favorite photography iPhone and iPad apps
My favorite and most-used photography apps for the iPhone and iPad are:
- FlickStackr - if you use Flickr this is a great mobile interface to it
- Camera+ - great for taking photos from the iPhone, then processing them
- Photogene for iPad - together with the camera connection kit, I can transfer photos (even RAW files) from my camera to the iPad, edit them on the iPad, and then upload them.
- The Photographer's Ephemeris - pick a place on earth and a date and calculate the time and angle of sunrise, sunset, moonrise, and moonset. Great for planning outdoor photos.
- iDoF Calc - calculates depth of field
- LightStudio - useful for pre-visualizing how different lighting schemes will look
- Strobox - only useful if you do complicated lighting with multiple lights, but great for easily creating diagrams of that to refer back to later
- Advanced Photoshop magazine for iPad - learn more about Photoshop
Wednesday, August 03, 2011
What would a giant do?
When I first got my iPad I thought of it as a kind of giant iPhone. Over time my mind has reversed this, and I now think of the iPhone as a tiny iPad, with a screen too small to make movies and comics look their best, too small to easily type on, and too small to use for drawing. The iPhone really only has one main advantage over the iPad: it fits in my pocket.
But what if I were a giant? Then I'd have really huge pockets, the iPad would fit in them, and I wouldn't need both an iPhone and an iPad. Brilliant! I love creative solutions like that. All I have to do in order to maximize my gadget efficiency is to become a giant.
And that proves that for any problem, if you just think outside the box a little, you can come up with a clear and simple solution that is completely impossible and useless.
Tuesday, July 26, 2011
Vancouver, B.C. Panorama (Gigapan)
I took the photos for this panorama while bicycling around Stanley Park, Vancouver, B.C.
Sunday, June 26, 2011
The Problem
"The core problem with Teen Titans is that it’s never been about teenagers, but rather what adult writers want teenagers to be. Superboy, Robin, Wonder Girl, Kid Flash – these kids revere their elders and try to emulate them. Fuck that noise. Adults don’t deserve reverence. Plus, teenagers don’t want to read about obedient, law-abiding teens, and adults reliving their youth don’t want to read about obedient, law-abiding teens. They both want sex, drugs, and rock n’ roll (or substitute in hip hop). The Titans shouldn’t be fighting crime, they should be fighting for the right to party, and generally reminding adults how much they suck."
-- The Hooded Utilitarian
-- The Hooded Utilitarian
Friday, June 03, 2011
Making the Final Battle photo

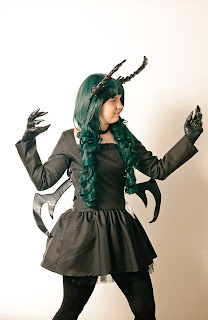
This was a cosplay photo based on the anime Black Rock Shooter.
For this photo I planned a lot out in advance. I asked the models to send me some example photos of the costumes so I could start thinking about what I wanted to do before the shoot. I realized that there wasn't any location available that would be right, so I planned from the start to do this as a composite photo, and we shot these indoors against a plain white background.
Kori was cosplaying as Dark Master (upper right), and I had her do some shots where she jumped up in the air and turned 180 degrees, then landed facing the opposite direction. With jumping shots, if I don't want it to look like jumping I'll often do something like this, or have the person jump sideways or backwards. Doing that takes away a lot of the characteristic body language of jumping and makes the pose a little harder to figure out.
So this was Kori's shot:


As soon as I saw this, I knew I could base a whole scene around this pose, because it looks like she is levitating, the pointed toes are great, and she has a wonderfully intense facial expression.
The shot of Emily as Black Rock Shooter that I ultimately used was this one:


I love her facial expression here, it is perfect for the character and the scene. She looks like she is completely ready to fight, but wishes she didn't have to.
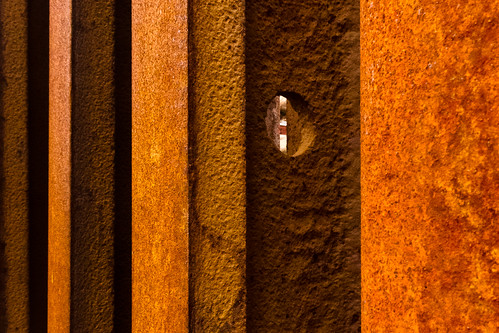
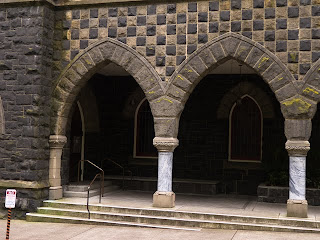
Prior to the shoot I had done some research to try to find background photos. If I'd had access to a suitable location I would have tried to take a background photo myself, but I couldn't find anything like this. So I searched for Creative Commons photos of a cathedral, and I was especially looking for one that would have the black and white checkerboard pattern that is a visual motif in Black Rock Shooter. I found a great photo taken by Kent Landerholm. The original photo is this:
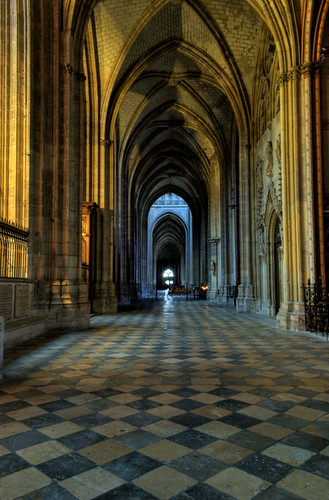
This is a wonderful HDR photo and it was just what I was looking for.
After the shoot, I started to think about how to lay out the composition. Here is one of my rough sketches for it:

You can see from this sketch that I'm still not sure what to do at this point. I'm trying out various positions. The circles and lines are a way of thinking about how the lighting might look, but I wound up doing something very different. The note "7 or 8" in this sketch was me trying to decide which photo of Emily to use.
I decided to mirror-image Kori and make a diagonal from lower left to upper right instead, because this sketch didn't feel right. But it helped me decide on a composition before I wasted a lot of time in Photoshop.
Once I decided on the layout, I put the elements together into a scene, and added in a "special effects" fractal that I had made in Oxidizer. I wanted the fractal image to be very high resolution, to actually be larger than the scene, so this took something like 2 hours to render on my laptop.
When I first put the elements into one image, that is when I had to make a decision whether to go ahead or bail out, because at this stage of the project it always looks pretty bad, nothing is blended yet, the colors are wrong, so I had to see some potential in it. In this case I thought I was on the right track.
The background photo is very wide-angle, with some spatial distortion because of that. Instead of trying to hide that, I actually increased it slightly by warping the background to make it "spill out" slightly more to the lower left. The Kori and Emily photos are taken from 2 different angles, so when put together they do kind of match the wide angle perspective of the background.
The colors in the original background photo are very yellow, and at first I tried to work with that, but it didn't work. My next approach was to desaturate the background to make it almost black-and-white, but that didn't feel right either. I decided on blue and purple for the main colors.
A lot of the work after that was painting in the new colors and the new lighting. I didn't use any Photoshop "Render Lighting" stuff here, it was all by hand. I also painted in some manga-style "speed lines" and added some "atmospheric heat distortion" to the area around Kori. I originally planned to do that with the ripple filter, but it didn't look right, so I ended up using the Liquify tool instead and putting in the distortion by hand.
When I got that figured out, I still felt it looked too "plastic." I decided to make it look like there was dust in the air, like in a very old building. So I started painting in "dust" layers, and this made it look a lot more like what I wanted.
One of my friends gave me a helpful critique of the rough draft of this piece, and based on his advice I added a bit of "distance blur" and increased the light and effects at the upper right to balance out the light at the lower left.
And that's about it. It was a lot of work, but in the end I got a scene that matched what I had imagined. All of this was inspired by the models Kori and Emily, I put in a lot of time on this because they gave me such great material to work with.
Friday, May 27, 2011
Making a Black Rock Shooter Scene
Here's a short explanation of one of the Black Rock Shooter scenes I did with Kori and Emily. First I used a white background, some lights, and a reflector, and took photos of the models.
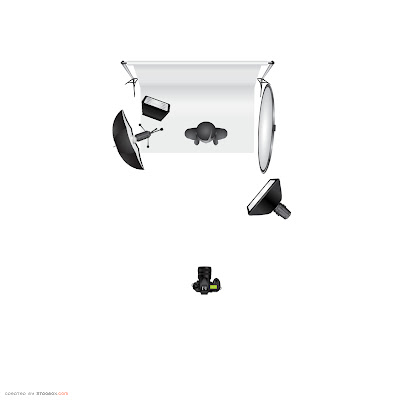 The light in the upper left corner is pointed at the background, the other lights are on the models. They did some battle scene poses, including Emily as Black Rock Shooter with the sword, and Kori as Dark Master in a fighting stance:
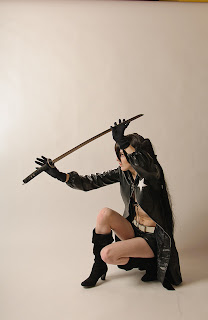
Then we needed one that could show Dark Master jumping/flying through the air, so Kori did this:
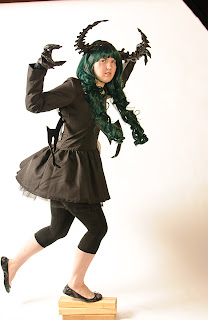 Having her balance on the boards was just a quick way to get the pose to look a little more like jumping/flying and less like just standing on the ground, but the hair doesn't look right for the final scene, and she's looking at the camera instead of to the side, so later I combined the lower part of this photo with the upper part of the previous one.
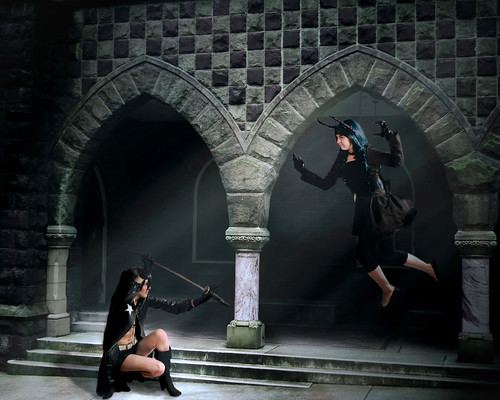
 I put these all together in Photoshop, cleaned up the background, mirror-imaged the other shots and combined the two Dark Master shots into one. Then I re-colored and re-lit everything. For initial background re-lighting I used Filter > Render > Lighting Effects. I used adjustment layers to approximately match the colors and brightnesses. Then most of the final additional coloring, lighting and shadowing was painted in by hand.
 The light in the upper left corner is pointed at the background, the other lights are on the models. They did some battle scene poses, including Emily as Black Rock Shooter with the sword, and Kori as Dark Master in a fighting stance:

Then we needed one that could show Dark Master jumping/flying through the air, so Kori did this:
 Having her balance on the boards was just a quick way to get the pose to look a little more like jumping/flying and less like just standing on the ground, but the hair doesn't look right for the final scene, and she's looking at the camera instead of to the side, so later I combined the lower part of this photo with the upper part of the previous one.
Then I took a photo of a building for the background. Luckily I found a building that had the type of checkerboard pattern that is often used in Black Rock Shooter.
 I put these all together in Photoshop, cleaned up the background, mirror-imaged the other shots and combined the two Dark Master shots into one. Then I re-colored and re-lit everything. For initial background re-lighting I used Filter > Render > Lighting Effects. I used adjustment layers to approximately match the colors and brightnesses. Then most of the final additional coloring, lighting and shadowing was painted in by hand.
 Here's the final result:
This was really fun. There's a lot I still need to learn in creating composite scenes like this, but I hope this post may encourage other photographers to try something like this.
Saturday, April 16, 2011
Uwajimaya Japan Festival 2011
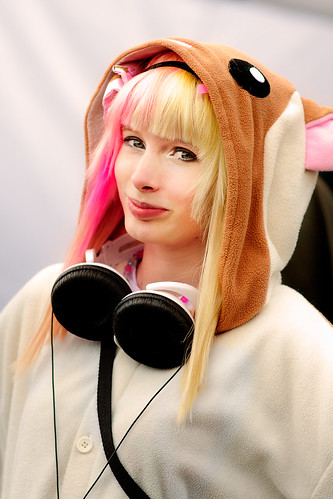
I went to the Japan Festival at the Beaverton Uwajimaya today. There were people there in cosplay, and I got to meet up with some of my friends who are going to be at Sakura-Con next week.
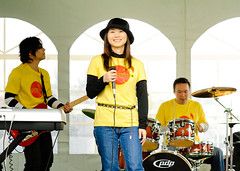
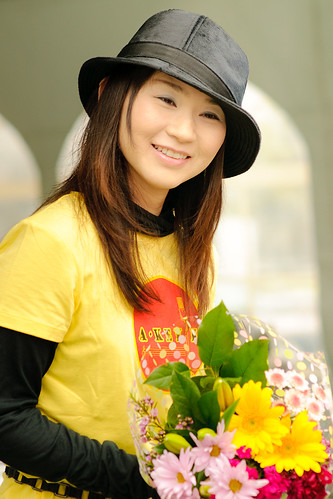
A-Key Kyo (above) performed, and did a fund-raiser for disaster relief for the Japan Earthquake. I got both of their DVDs.
It had been a while since I last saw A-Key Kyo, but they were just as fun as I remembered.
Friday, April 01, 2011
Subscribe to:
Posts (Atom)